Creating an Animated
Lens Aperture Creating
Flash animations with Group Blends
This is a great tip on how to create a
cool Flash animation using the ability to Blend complex Groups
of objects then releasing them to layers. This example will be of animating
a particularly odd object, a Lens Aperture.
Follow the steps below to see how to create
some really neat effects in Flash using FreeHand as a helper.
Version: 9 and above
Tip idea provided by:
James E. Talmage Content written by Ian Kelleigh
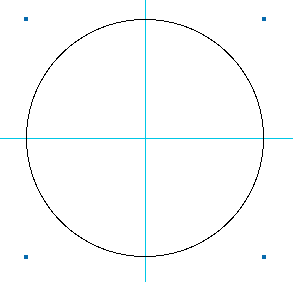
1)
In a new document, criss-cross a
horizontal and vertical Guide.
Select the Ellipse tool,
then holding the Option (Alt)+Shift keys, drag out a constrained
circle from the intersection of the guides like shown above.
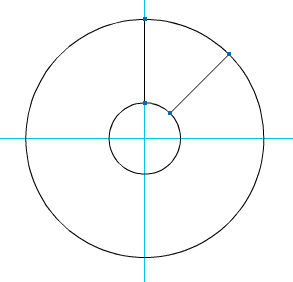
2)Clone this new circle. Then
in the Transform palette, Scale the clone about 30%
uniformly. You can use other scale amounts if you prefer.
3)
Select both circles and Ungroup
them. Then under the Xtras menu -> Distort -> Add Points.
Or you can use the toolbar button.
You should have both circles looking
like the above example so far.
Now, click-drag around both
the circles to select all of the Points. Then do the Split
command under the Modify menu. This splits the circles into little
arcs between the points.
4)
Now Shift+select an arc from
the larger circle and it's corresponding arc from the inner circle.
Then Join them from the Modify
menu. Then in the Object inspector, turn on the Closed
option.
Note:
you can assign a key command for the Close operation. Go under
the File -> Customize -> Shortcuts menu. Then look in the
Other section -> Paths -> Close. I use the Command+Shift+C
command for this. You can use whatever you like. This makes it
much quicker to close open paths instead of going to the palette
all the time.
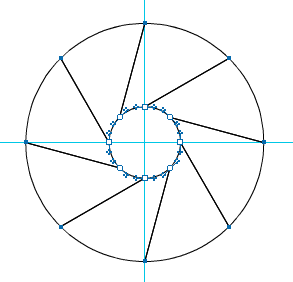
5)
Repeat step 4 for the remaining
arcs. You should now have a bunch of "pie" shapes like
shown above.
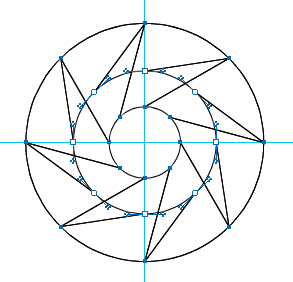
6)
Now click-drag to select the inner
points of the objects. Then in the Transform palette,
Rotate the points 45°. You can really use any value
you want to for this depending on your needs.
After the rotation, select all the
shapes and Group them together. Then go under the Modify
Menu and Lock them. After that, Clone the group
to make the next transformation.
7)
Now hold the Option (Alt) key and
click-drag to select the inner points of the objects again.
Then in the Transform palette, Scale the points 200%.
Again, the value doesn't really matter, you can customize any
of these values to experiment with them.
After you Scale the points, you
should now see two group of objects like shown above.
8)
Select both groups and in the Fill
inspector, choose a Gradient fill. Above I simply used
Black as the top color and a 40% Tint of that Black for the bottom
color.
Now while they are still selected,
choose the Unlock command under the Modify menu. This unlocks
that group that was locked earlier.
9)
Keeping both groups selected, Blend
them under the Modify -> Combine menu. You can adjust
the number of steps to fit your needs. The more the steps, the
slower the final animation will be. I chose to use 25 steps
for this example.
Special
Note
You should take a look at
the Blend under Keyline mode for a minute before
you continue. If you see strange blending going on like
shown above, there is a quick fix for this.
First Undo the Blend
step. Keeping the groups selected, use the Transform
palette to rotate both of them about 10°
or so. Then repeat the Blend command. If you continue to
see these strange anomalies in your Blends, keep undoing
the Blend, rotating, then reblending until it looks perfect.
This is a strange bug for
sure, and am not quite sure why it happens or why rotating
the groups fixes it, but remember this workaround for future
projects.
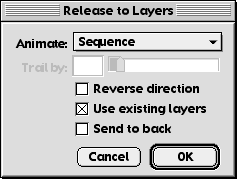
10)
Now select the Blended objects and
bring up the Release to Layers dialog either with the toolbar
button or go under the Xtras menu -> Animate.
Here, choose the Sequence
option and turn on the Use existing layers option.
When you hit OK, you'll get a whole
bunch of layers ready to export as a Flash SWF file. In FreeHand
10, you can test the animation by using the Flash Controller
toolbar to quickly see if the animation is what you want before
you export.
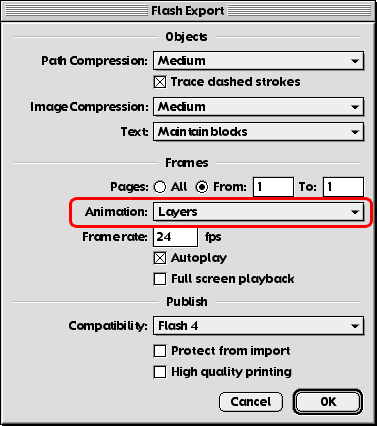
11)
Now go into the Export dialog.
Select the SWF format. Go into the Options and make sure
that you choose Layers as the Animation type as shown above. Then
Export.
You can import this SWF file into Flash
for further editing if you prefer. Also, you can copy the imported frames,
and reverse the order in order for you to get the aperture to
open, then close.
The possibilities for creating these kinds
of effects are endless. The ability to blend complex groups and paths
can be very handy in creating these kinds of animations that programs
like Flash or Fireworks just can't do. If you have any more tip ideas
on how to create neat animations like this, please send them in.